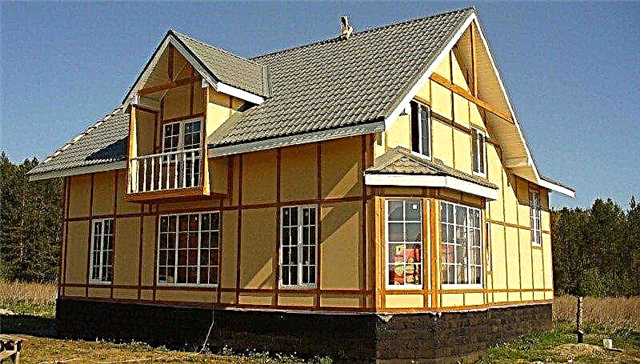
For the construction of a high-quality metal tile roof, it is necessary to carefully study the technology of work, be able to handle metalwork tools and prepare all the necessary materials. The instructions for the entire process are described in detail below.. Do-it-yourself metal roofing is mounted (although several assistants will still be needed: for transportation and delivery of metal sheets to the place of attachment).
The main characteristics of the material
A metal roof is a structure made of steel sheets from 0.35 to 0.7 mm thick (the thicker the sheet, the tougher and more stable the roof), galvanized on both sides and coated on the outside with a polymer composition (plastisol or polyester). Sheets of metal usually have a width of 1 m and a length of 1 to 7-8 meters.
Among the advantages of a metal roofing:
- low weight (no more than 6 kg per square meter) due to the maximum possible thinning of the steel sheet: from 0.4 mm to 0.7 mm;
- resistance to temperature extremes;
- ease of replacement of deformed sheets of material;
- resistance to corrosion;
- long service life (up to 50 years) and reliability;
- relatively low cost of material;
- a huge selection of coating colors (at least 25 different colors and shades).
When choosing a suitable metal tile, it is recommended to pay attention to the material with a thickness of 0.5-0.6 mm, because a sheet with a lower weight is more likely to be deformed in the area of the nodes, so you will have to make a replacement. The thickness of the sheets of metal is a very important characteristic, because with an increase in strength, the strength characteristics of the entire roofing cake also increase. However, the thicker the roof covering (maximum 1 mm), the greater the weight you have to keep on your roof, so you will have to strengthen the rafters.
Basic installation rules
The roofing of metal should be made in accordance with established rules, the main of which are listed below.
The minimum angle of inclination of a conventional metal-roof is 14 degrees. If a gable roof structure is assumed, then the laying of sheets begins from the lower left corner of the slope, with each next sheet being laid on the previous one, taking into account the overlap in one wave. If the angle of inclination is less than 14 degrees (which is not entirely correct), then the overlap must be done already in two waves.
In the case of a tented roof, you need to start the arrangement from the most elevated section of the structure, and then go down, in opposite directions.
The lower edges of the latest metal tiles should protrude above the cornice by at least 3-5 centimeters. In addition, the bottom and edges of the steel sheets must be hemmed with boards.
Installation of a roof made of metal is carried out using self-tapping screws with rubberized gaskets screwed into the waves of sheets along the lower edge in increments of 7-9 pcs / m2.
The horse must be covered with compacted additional elements. At the upper ends of the profiles it is correct to use semi-cylindrical parts, because due to their shape they are more reliable and firmly held on the ridge.
In order to make a roof endova, you will need: firstly, an intermediate structure, and secondly, a gutter element mounted on the skin with this structure.
When arranging additional elements of the roof, gaps always form, which must be sealed without fail. Correctly do this with silicone sealant, as well as sealing tapes.
Inside, in the under-roof space, the metal coating remains very cold, in addition, developers often notice the accumulation of condensate. Therefore, in order not to spend money on replacing damaged material, it is important to properly assemble the metal-roofing cake, including in advance layers of material that provide high-quality vapor barrier and ventilation.
Necessary tools
In order to cover the roof with your own metal tile, prepare the following tools:
- Drill-screwdriver (it is necessary to have a nozzle for a self-tapping screw with a hex head);
- A tool for cutting metal sheets (for example, a low-speed circular saw with carbide teeth, an electric jigsaw, a hacksaw for metal or a special nozzle for a drill designed to cut metal);
- Measuring rack and tape measure;
- Trace cord;
- A hammer (in addition to the standard one, you will also need a rubber one, which is used if necessary to correct the construction site without damaging the protective coating of the metal tile sheet);
- Gun with silicone sealant;
- Marker.
In no case can you use a grinder with an abrasive wheel to cut metal sheets, because it will irretrievably burn the place of the cut and all the nearby coating.
No protective film or paint, smoothing defects of a metal tile, will save from the corrosion that appears on the places cut by the grinder. In this case, replacement of the coating cannot be avoided.
Features and composition of a roofing cake under a warm roof
The key moment when erecting a roof from a metal tile is a properly equipped insulation cake. Any element of the composition of this cake plays a very important role, so, ignoring its installation, you can not count on the most comfortable operating conditions for the future roof. Therefore, we will analyze each step step by step. Note that the layers of the roofing pie have a clear laying sequence, which can not be changed categorically.
So, the composition of the cake for a warm roof includes:
- Longitudinal shoulder straps and rafters (this is the roof frame, roof structure);
- Vapor barrierreleasing steam from the house, but not letting it off the street. The vapor barrier film is attached to the inside of the crate;
- Thermal insulation material (for example, mineral wool), laid between the lags of the roof structure (it is necessary to leave a place for ventilation between the layers of the cake, because at high humidity the material loses its heat-insulating properties);
- Counter grill - a layer of cake whose function is to fasten the roofing lathing. It is attached parallel to the rafters, pressing a layer of waterproofing material;
- Crate - (bars with a section of 50x50, attached along the slope with a step of 30-35 cm.);
- Waterproofing membrane - is needed in order to prevent the penetration of condensate settling inside the roof. The waterproofing is laid in such a way that between it and the insulation, as well as between it and the coating there is a free space of 4-5 cm.
- Metal tile - spreads directly on the crate.
Features of a roofing pie under a cold roof
The layout of the roofing cake for a cold roof is much simpler than for a warm one. In fact, the pie includes only the crate, sheets of metal and waterproofing.
First of all, the film needs to be fixed using a construction stapler or small nails. After that, a counter-lattice rests on top of it, and the self-tapping screws securing it simultaneously press on the waterproofing film.
As in a cake for a warm roof, the waterproofing is fixed with some indentation both from the crate and from the coating material (about 2-3 cm). Indentation is done so that condensate accumulating under the roof drains freely into the gutter. If you do not indent between the waterproofing, but attach it with a large fit, then moisture will quickly provoke corrosion of the roof. On top of waterproofing and counter battens, a crate is laid similar to that used for a warm roof. Installation of vapor barrier in this case is not required.
The technology of building a metal roof without insulation in residential buildings is rarely used due to the lack of sound insulation, as in a warm roof.
Mounting the roof ridge
Before laying the ridge plank, it is necessary to ensure reliable ventilation of the space under the roof. If for this it is decided to make point ventilation products - then they must be sealed at the edges, in order to avoid deformation.
If the ridge is flat, then its planks are mounted with an overlap, and if it has a semicircular shape, then fixation is made along the lines of the metal-plastic profile.
The ridge nodes of the roof with slopes of a triangular and trapezoidal shape are arranged by fitting the plank of the ridge to the spinal slope, bending or bending as necessary.
End nodes
To properly equip the roof nodes from metal, you need an intermediate structure and a gutter element mounted on this structure. In addition, the endow needs to be strengthened by reinforcing the crate with additional flooring boards fixed between the main bars.
Installation of the endova slats is carried out with an overlap of 0.2-0.4 m, moving from the eaves to the ridge. On the lower bar at the level of the cornice you need to make a side. A seal must be made directly under the ridge and under the last plank of the valley.
Bordering a roof tile, it will be correctly cut at a distance of 7-10 cm from the axis on one or the other side.
The endova is attached to the self-tapping screws, and if the sheets are cropped, then they and the endova need to be fixed at the points of contact of the metal tile floor and the plane in which the endova bars are fixed:
- on the bar, deviating from the axis of about 30 cm;
- on the profile, at the very bottom of the wave, below the stamping by 1.5 centimeters.
Sometimes the places of cut of roofing sheets are additionally decorated with special overlays, stacked from bottom to top with an overlap of at least 10 cm. In addition to their decorative function, these pads also reduce the risk of blowing snow masses under oblique sections of metal roofing. In addition, thanks to the linings, water is easier to slide into the valley.
Pipe bypass technology
The structure of the roof structure includes not only flat slopes, but also other elements: chimneys, ventilation pipes and channels. Because of this, the procedure for overlapping the roof is complicated, so here you need to adhere to a different instruction:
- first, waterproofing is laid on the sides of the installed object;
- then on the surface of the ramp you need to install a groove that will drain water. It should stand at a distance of no further than 0.8 m from the high wall of the pipe;
- further, according to the instructions, an additional crate is placed slightly above the aisle;
- steel sheets of the roof are cut from two sides of the pipe.
The design will be reliable only if the following installation rules are observed.:
- during fixing the apron with self-tapping screws, the sealant will be used correctly;
- the nearest apex of the steel sheet wave should be closed with an apron;
- First, the inner, and only then the outer, upper apron is attached, with which a metal profile should be covered by 10 cm.
If the apron is installed directly in the incision, then water and thawed snow will inevitably flow into it, which does not leave you even hopes for a warm, functional roof.
The roof structure of the covered metal tile is strong and durable, and provided that you follow all the rules for laying both the metal sheets themselves and the entire roofing cake, your roof will also have excellent performance characteristics.