Before starting the construction of a house for summer use or permanent residence, it is important to determine the material of wall structures. All elements of the house depend on this choice: their design solutions and materials for manufacturing. Wall technology especially affects ceilings and foundations. The best option in terms of cost and quality will be a frame-panel house. Using such a system, you can build both summer cottage facilities and more serious buildings.
Advantages and disadvantages
Frame-panel houses, like any others, have their advantages and features. Before you build a house, it is important to study them, take timely measures to eliminate weaknesses and correctly use the strengths.
The technology of building a frame house for permanent residence allows you to get the following advantages:
- Skeleton panel house is easy to assemble. It is enough to prepare the components. Even a layman can assemble a frame. The installation speed is quite high, the complexity is reduced.
- Ease of calculation. When designing foundations for such a house, it is difficult to make critical mistakes, since the load from the overlying structures is small. It is also not difficult to calculate the wall structure; you can use standard sizes for certain floor heights and pitch of the frame racks. It is important to remember only one thing: the less often the supporting structures are located, the higher the floor height, the less stable the frame elements.
- No seasonality of work. Many structures are difficult to erect in the cold season due to the use of cement mortars or other materials that are sensitive to ambient temperature. The technology allows for construction even in winter without violating requirements and construction.
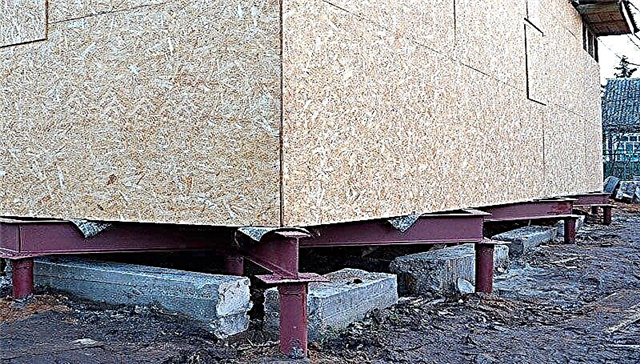
- Savings on foundations. Due to the small mass of the walls, the frame-panel panel house can be relied on screw piles with their own hands. The most common diameter used for private construction is 108 mm. Such supports will be inexpensive, but, for example, for brick or concrete houses will not work because of the low bearing capacity.
- Easy finish. The surface of the cladding of the frame house is flat and does not require complex preparatory work. this reduces the cost and complexity of the construction process. Dignity is relevant for both indoor and outdoor decoration.
- High efficiency of walls in terms of thermal protection. The design uses an effective modern insulation, most often mineral wool. Due to this, it is possible to achieve high performance with a sufficiently small thickness of the outer enclosing structure. This is especially important for a house intended for permanent (winter) residence.
The disadvantages include the following characteristics:
- Instability to soil deformations. They do not lead to the destruction of the building, if the construction technology is followed, but a light building is not able to withstand the rise of soils. With this phenomenon, a roll appears.
- Low rigidity. Especially skeleton panel houses are afraid of wind loads that act perpendicular to the walls. The racks of the frame can not always withstand severe pressure, which will lead to arching of the walls.
- It is important to control the absence of cold bridges through which heat loss can occur.
- Wooden elements are not resistant to decay, fungus, mold. Additional antiseptic treatment is required.
- The need for reliable protection against moisture. It is required from two sides: from the outside of the water, from the inside of the steam. Such events increase the cost of construction.
- The low mass of the walls cannot ensure the thermal stability of the object. A house for winter living quickly heats up, but at the same time it easily gives off heat. This is true for the summer period. For example, a brick building heats up for a long time, so it’s cool in the summer. For a frame house, this does not work.
- Low strength. The wooden frame allows you to build houses (for permanent residence or use as a country house), one-story or two-story. The walls will not cope with the greater load.
- Instability to fire. The material is not able to stop burning. For such objects, fire distances to neighboring buildings also increase.
Step-by-step construction instructions
The technology of a frame-panel board house involves its construction in several stages. Each of them needs to be given enough attention so that during operation there are no problems. It is worth starting the construction from the design stage. The reliability of the future object depends on a competently designed project.
At the design stage, you will need to perform the following tasks:
- selection of materials for the manufacture of structural elements of the house;
- development of floor plans;
- binding the house on the site;
- foundation calculation;
- drawing up specifications and estimates.
The last point cannot be completed without drawings, but it is necessary. Estimates and specifications will allow you to calculate the cost of construction before it starts, evaluate your capabilities and purchase the necessary amount of materials (with a small margin).
If there is no confidence in the ability to draw up a competent project yourself, it is better to turn to professionals. It is not necessary to develop an expensive individual solution; you can choose from standard buildings and make partial changes to them.
Step-by-step instructions for building a house include the following items:
- marking for foundations;
- excavation;
- manufacturing of the supporting part of the house;
- erection of a box at home;
- roofing device;
- decoration and utilities.
All these points are relevant when a one-story or two-story house is being built. You will also need to fulfill them if you need a summer cottage or for permanent residence. This step-by-step instruction is suitable for building from any materials, all points are carried out regardless of the structure of the building. Further about each stage in more detail.
Marking axes or foundations
For work, you will need to prepare a cord, boards for casting, tape measure. If it is possible to attract special equipment, then the laser level is suitable. The step-by-step instructions for breaking down the axes are as follows:
- removal of the first wall of the house (most often located parallel to the fence or the border of the site);
- designation of the first point, construction of a right angle from it by the Egyptian triangle method;
- building all sides and corners of the house;
- validation if the structure has a rectangular or square shape is easy to do: you need to measure the diagonals, which should be equal.
The designation of the axes and sides of the foundation is done with a cord, which is attached to the spreader installed at a certain distance from the house along the perimeter (so as not to interfere with the development of the soil).
Soil development
This stage depends on the type of foundation chosen. The following types of work can be given, depending on the design:
- tape, house with a basement - digging a pit;
- tape, a house without a basement - a trench;
- plate shallow or deep laying - foundation pit;
- columnar - separate notches;
- bored piles - wells;
- screw piles - no prior development is required.
In any case, before starting work, you need to remove the upper fertile soil layer, which averages 20-30 cm.
Foundations
For a frame-panel house, there is no need to mount massive supports. The most optimal will be the following options:
- shallow tape;
- columnar supports;
- screw piles.
House box
Construction at this stage involves the assembly of walls and floors. One-story and two-story buildings are being built according to the same algorithm. The instruction for the manufacture of the frame of the structure is as follows:
- Laying insulation between the walls of the house and the foundation structure to prevent the destruction of structures due to different humidity of materials (roll types are used as waterproofing, such as roofing material, glassisol, linocrom, hydroisol).
- Next, perform bottom harness. As a material for its manufacture, a beam of increased cross section is used (approximately by a factor of one). The lower harness must be reliably connected with the foundations, for which special pins are used. In the beam under them, you need to drill holes.
- After fixing the harness in it, perform gash. This technology will reliably support the frame racks on the beam. Before installing the racks, check their geometric dimensions, the length should correspond to the design.
- Having installed the frame racks, the upper harness is mounted, in which, according to the same technology as for the lower one, they are prepared holes for vertical elements. If a one-story house is being built, the upper harness plays the role of Mauerlat. If necessary, continue work on the construction of the second floor, I do the same. Racks are mounted on an existing beam, and on top they make another row of strapping.
- Complete the single-story walls with installation horizontal jumperswhich will add rigidity to the structure.
- Between the walls of different levels, you will need to perform work on floor device. Milking a frame house, the most common option is the installation of floors on wooden supporting beams.
- Building box ends the roof. It rests on the upper frame of the frame. Most often, pitched roofs are used on wooden rafters. Depending on whether the subroof space will be used, it is necessary to provide for thermal insulation, vapor barrier and hydro-wind protection.