The crafted concrete window sill looks sophisticated and elegant at home and in a formal office setting. The relevance of the design is due to practicality, fire resistance, frost resistance. Such window sills can be painted in different colors, easily restored and environmentally friendly. Creating and installing has several steps.
Materials and tools
Reliable concrete window sills require the use of high-quality building materials and professional power tools. A set of different devices for creating a windowsill:
- construction vacuum cleaner;
- Bulgarian;
- drill, screwdriver;
- laser level;
- hard putty, putty knife, painting paper.
- wooden structures of various widths and lengths for formwork;
- metal grid;
- roulette;
- self-tapping screws and other fasteners.
For decorative purposes, nitro enamel or colored varnish is used, for protection - linings (running elements from scratches, chips and other damages).
Surface preparation
Before the manufacture of the window sill, the window sill is prepared - it is cleaned. If installation is done after plastering the slopes, a recess is made for the panel along the slope, as well as on the front of the wall, 6 cm on each side. They are performed under the so-called ears of the windowsill.
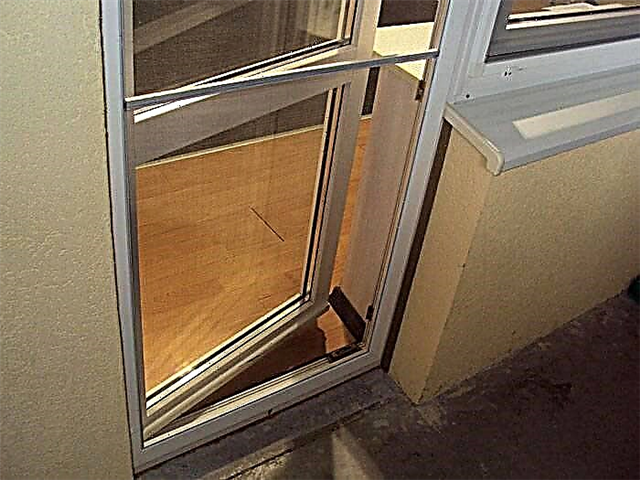
The corner is cut to the same level as the bottom of the window unit. A laser is installed, the distance from the bottom of the window unit to the red line that the device issues is measured, and the dimensions are transferred to the outer corner.
When making concrete window sills, it is important not to miss this moment. This is done in order to eliminate poor-quality alignment of the outer angle between the slope and the wall after installation.
The first picture shows how the distance between the infrared beam and the window frame is measured. The second shows that a similar action takes place with respect to the outer corner. It is noteworthy that both there and there, the distance should be the same, for example 7.2 cm.
After excavation and processing of the outer corner, the window sill is cleaned from dust, debris and dirt. Brush and broom are not effective. Cleaning is carried out with a vacuum cleaner. At this stage, the preparation of the work surface is completed.
Window sill mounting
There are two ways to make a concrete quality windowsill yourself. In the first case, the window sill is cast separately. The second is made immediately on the spot. Choosing the last option, the problem is solved, how to make a concrete window sill comprehensively.
The components of the window sill:
- formwork;
- cement mortar;
- metal grid;
- power tools and connecting elements (self-tapping screws, bolts).
Making a window sill made of concrete with your own hands begins with formwork. It is recommended to make a mold for pouring concrete in place - the window sill. This is the best option for installing a concrete window sill with your own hands in a short time with a minimum of cost.
Formwork
In the manufacture of formwork, the width and length of the future product are measured. For example, at 17 cm, the width of the board should be 2-3 cm, the height should be up to 4 cm. This is enough to make the window sill of standard dimensions.
The connection of wooden structures is carried out with self-tapping screws using a drill and a screwdriver.
The figure below shows the finished structure adjacent to the work surface. The difference is that the window sill in the photo is open.
After excavation and processing of the outer corner, the window sill is cleaned from dust, debris and dirt. Brush and broom are not effective. At this stage, the preparation of the work surface is completed.
The photo shows the formwork on the inside of the window sill. This form should have a ready-made design for filling the window sill in the room.
For the installation of formwork, iron fixed elements are used. They allow you to securely install the product.
In the lower part of each element, two holes are made for self-tapping screws for installing the formwork. Screws are used in the work (used are allowed) and a screwdriver. Finished formwork is as follows.
Fixing the formwork with screws from the bottom looks like this.
To prevent cement slurry, additional structures are nailed to the sides. This completes the production of formwork.
Surface preparation for cement pouring
After cleaning the window sill of the mesh, the required width is constructed. It is needed for high-quality filling. Folds in two and fastens with wires for reliability. Each piece of wire is lowered into a brick hole and secured to the grid.
If there are gaps between the formwork and the window sill, silicone is used. It will help avoid leakage of the solution.
Cement mortar
For the manufacture of the mixture used cement, sand, gravel. The proportions for the solution are one to two, that is, 1 hour of cement / 2 hours of sand. Concrete is recommended to use grade 400. The resulting mass should not be very thick.
After preparation, the solution is poured, initially filling the holes in the brickwork.
After pouring, you should get such a picture.
After that, the surface is left to dry completely. After which there is a surface grinding, decorative processing, installation of overlays.
Window sill decoration
After the surface dries, all sagging, roughness and protrusions are removed with a spatula. Below in the photo is the windowsill after drying.
Then the finish leveling is done using putty (gypsum or finished acrylic). The number of composition layers - at least two. The main thing is to achieve a smooth final surface.
After the putty dries, the surface is sanded with fine painting sandpaper. Then the dust is removed from the windowsill and the primer is applied again.
A perfectly flat surface is depicted in the photo.
After final drying, the surface is painted. Light enamel or a water-based option is taken - it does not have a pungent smell. Painting is carried out in several layers with a brush or a narrow roller.
Protection
Window sill covers are of several types. There is a bluish and pinkish tint, wood-like. The installation of thin plastic profiled sheets begins with cutting the desired size form. To cut them straight along the edges, use a jigsaw and a paper template.
Before the sticker, the windowsill can be degreased. The pads are attached to the surface with mounting glue. The adhesive composition is distributed on the surface first with a solid line, then in a zigzag pattern, with rings and as other patterns. The main thing is to fill the whole space.
A prepared pad is placed on the oiled base and pressed against something heavy. After the glue dries and the load is removed from the window sill, side plugs are placed. This completes the installation of the lining.
The photo shows a finished window sill with overlays. Elements not only protect the window sill from deformation, but also give a gloss effect. Due to this, the window sill looks presentable.
If necessary, repair the window sill, neatly in the same sequence, all elements are removed from the window sill. Hardened concrete is removed with a hammer or sledgehammer.