Reysmus - a tool for drawing straight lines, marking the future cut of a wooden or metal workpiece.
What can
Reysmus was designed for carpentry. He can:
- Mark future cut lines parallel or perpendicular to the edge of the board.
- Mark edge for jointing.
- Mark out various product connections.
- Define the center of the radius.
The tool is used to transfer dimensions from the drawing or the reference part to the workpiece, to search for the center of the circular radius.

In the drawing case, the thickness gauge is used to draw parallel lines at a given distance on the circuit.
Tool working area - sharpened blade or scratch needle. With their help, a risk is formed on the surface of the wooden blank to facilitate cutting. The engineering surface gage is equipped with a stylus providing parallel lines.
Varieties
Reysmus is not only a classic marking tool, but also a mechanical machine that performs marking, cutting parts.
Joiner
The design is a wooden block, on both sides of which are attached movable rails with working needles and studs. Component rails and holes in the block have a rectangular or square cross-section, which prevents the rotation of the working bodies during use. The set size is fixed perpendicular to the peg in the block.

The tool is universal, suitable for working with parts of different sizes. The needles and pins on both sides are usually different, the right nozzles are used for work.
Joiner thicknessers are also used as a center finder. The block and slats with needles are strictly perpendicular to each other, a ruler is fixed between them by the bisector, and the center of the diameter is brought out.
The joiner thicknesser can be one-sided (only one rail is fixed on the block). Use when working with one type of material and workpieces.
Another view is a tool for manual work with schemes. Instead of a needle, a pencil clip. Use as a compass for measuring and drawing radii parallel to lines.

Locksmith
The marking device has a high fixed block with long scriber rods. The rack is attached to the base, marking bodies move in a circle. The distance between the lines is set by moving the rods along the rack or by dragging the scriber along the rod. One of the models is a slide bar.

Difference
Joiner's and metalwork thicknessers differ only in the way they move relative to the workpiece:
- Joiner. The emphasis is on the edge of the workpiece. The working end must be quality machined, the board is firmly pressed to the base holder.
- Locksmith. Move along with the base parallel to the workpiece.
In both cases, the instrument is set up before use according to the working diagrams.
Equipment with a printed scale allows you to transfer dimensions from drawings, take measurements with an accuracy of tenths of a millimeter.
Make or buy
Even the simplest universal marking planer is expensive. You should buy it when the work requires high accuracy. For a carpentry workshop, personal farm, you can independently make a marking planer.
Hardwood is used for manufacturing, so that the product retains its characteristics longer.
To apply scratches, special pins with sharpened needles are used.
How to do
To make a home-made marking surface gage you will need:
- 2 wooden slats,
- calipers,
- milling cutter
- pencil,
- ruler
- pins or needles.
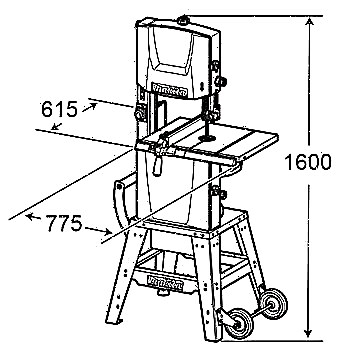
For the convenience of work, you can use the scheme.

Dimensions when processing wood billets are observed to obtain a reliable and rigid connection.
Step 1: making the bar
The cross section of the rod is 19 x 19 mm. The rail is taken with sides of at least 20 x 20 mm, processed to the specified parameters. The sides should be even. After manufacturing, the dimensions are checked with a caliper. It is possible to partially round off the upper plane of the bar using part of the cutter.
Step 2: turning the pad
In the manufacture of the pads, it is required to observe the accuracy of the size of the hole into which the rod will be inserted. A wedge is provided for fixation. It is inserted from above, secures the working body in the desired position.
For the convenience of cutting, make a paper template, glue it to the workpiece. The shape of the pads is cut out on it. Then process the edges. The hole is grinded with a chisel and files of various shapes. Constantly check the sizes with control tools. The top of the window should be as beveled as the bar.
At the ends, holes for needles are pre-machined.
Step 3: wedge
The smallest detail is machined from a thin board. Processing is carried out on fibers to maintain the strength of the wedge. A paper template is cut out, a part is machined on it.
Step 4: Build
When the parts are ready, they are connected. Sharpened pins with needles are inserted into the grooves of the rod.
Reysmusovy measuring instrument is easy to manufacture, but you must comply with the dimensions of the workpiece. In a similar way, you can create other types of devices.